Saturday 25 February 2012
RC6 Call for testing in Ubuntu 12.04 Precise Pangolin LTS, part 2
The Ubuntu Kernel Team has uploaded a new kernel (3.2.0-17.27) which contains an additional fix to resolve the remaining issues seen with the RC6 power saving enabled. For users with Sandy Bridge based hardware we would appreciate them to run the tests described on https://wiki.ubuntu.com/Kernel/PowerManagementRC6 and add their results to that page.
Sunday 19 February 2012
RC6 Call for testing in Ubuntu 12.04 Precise Pangolin LTS
The Ubuntu Kernel Team has released a call for testing for a set of RC6 power saving patches for Ubuntu 12.04 Precise Pangolin LTS. Quoting Leann Ogasawara's email to the ubuntu kernel team and ubuntu-devel mailing lists:
"Hi All,
RC6 is a technology which allows the GPU to go into a very low power consumption state when the GPU is idle (down to 0V). It results in considerable power savings when this stage is activated. When comparing under idle loads with machine state where RC6 is disabled, improved power usage of around 40-60% has been witnessed [1].
Up until recently, RC6 was disabled by default for Sandy Bridge systems due to reports of hangs and graphics corruption issues when RC6 was enabled. Intel has now asserted that RC6p (deep RC6) is responsible for the RC6 related issues on Sandy Bridge. As a result, a patch has recently been submitted upstream to disable RC6p for Sandy Bridge [2].
In an effort to provide more exposure and testing for this proposed patch, the Ubuntu Kernel Team has applied this patch to 3.2.0-17.26 and newer Ubuntu 12.04 Precise Pangolin kernels. We have additionally enabled plain RC6 by default on Sandy Bridge systems so that users can benefit from the improved power savings by default.
We have decided to post a widespread call for testing from Sandy Bridge owners running Ubuntu 12.04. We hope to capture data which supports the the claims of power saving improvements and therefore justify keeping these patches in the Ubuntu 12.04 kernel. We also want to ensure we do not trigger any issues due to plain RC6 being enabled by default for Sandy Bridge.
If you are running Ubuntu 12.04 (Precise Pangolin) and willing to test and provide feedback, please refer to our PowerManagementRC6 wiki for detailed instructions [3]. Additionally, instructions for reporting any issues with RC6 enabled are also noted on the wiki. We would really appreciate any testing and feedback users are able to provide.
Thanks in advance,
The Ubuntu Kernel Team"
So please contribute to this call for testing by visiting https://wiki.ubuntu.com/Kernel/PowerManagementRC6 and follow the instructions. Thank you!
Friday 17 February 2012
Introducing the Firmware Test Suite Live (fwts-live)
Firmware Test Suite Live (fwts-live) is a USB live image that will automatically boot and run the Firmware Test Suite (fwts) - it will run on legacy BIOS and also UEFI firmware (x86_64) bit systems.
fwts-live will run a range of fwts tests and store the results on the USB stick - these can be reviewed while running fwts-live or at a later time on another computer if required.
To install fwts-live on to a USB first download either a 32 or 64 bit image from http://odm.ubuntu.com/fwts-live/ and then uncompress the image using:
Next insert a USB stick into your machine and unmount it. Now one has to copy the fwts-live image to the USB stick - one can find the USB device using:
..so the above example it is /dev/sdb, and copy using:
..and then remove the USB stick.
To run, insert the USB stick into the machine you want to test and then boot the machine. This will start up fwts-live and then you will be shown a set of options - to either run all the fwts batch tests, to select individual tests to run, or abort testing and shutdown.

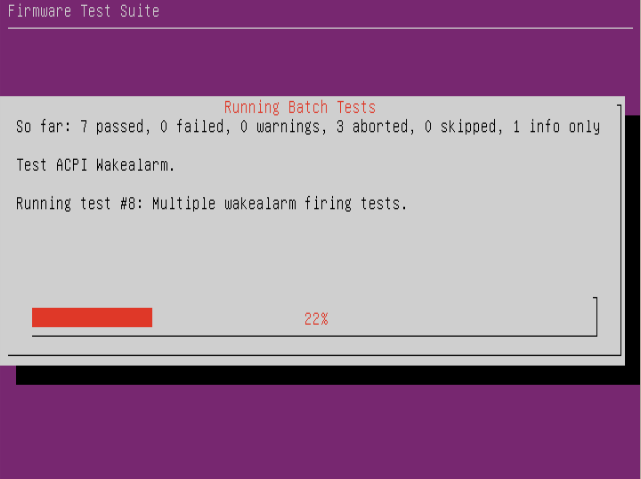
If you chose to run all the fwts batch tests then fwts will automatically run through a series of tests which will take a few minutes to complete:

and when complete one can chose to view the results log:

if "Yes" is selected then one can view the results. The cursor up/down and page up/down keys can be used to navigate the results log file. When you have completed viewing the results log, fwts-live will inform you where the results have been saved on the USB stick (so that one can review them later by plugging the USB stick into a different machine).

A full user guide to fwts-live is available at: https://wiki.ubuntu.com/HardwareEnablementTeam/Documentation/FirmwareTestSuiteLive
To help interpret any errors or warnings found by fwts we recommend visiting fwts reference guide - this is has comprehensive description of each test and detailed explanations of warnings and error messages.
Below is a demo of fwts-live running inside QEMU:
fwts-live will run a range of fwts tests and store the results on the USB stick - these can be reviewed while running fwts-live or at a later time on another computer if required.
To install fwts-live on to a USB first download either a 32 or 64 bit image from http://odm.ubuntu.com/fwts-live/ and then uncompress the image using:
bunzip2 fwts-live-*.img.bz2
Next insert a USB stick into your machine and unmount it. Now one has to copy the fwts-live image to the USB stick - one can find the USB device using:
 dmesg | tail -10 | grep Attached
 [ 2525.654620] sd 6:0:0:0: [sdb] Attached SCSI removable disk
..so the above example it is /dev/sdb, and copy using:
 sudo dd if=fwts-live-oneiric-*.img of=/dev/sdb
 sync
..and then remove the USB stick.
To run, insert the USB stick into the machine you want to test and then boot the machine. This will start up fwts-live and then you will be shown a set of options - to either run all the fwts batch tests, to select individual tests to run, or abort testing and shutdown.

If you chose to run all the fwts batch tests then fwts will automatically run through a series of tests which will take a few minutes to complete:
and when complete one can chose to view the results log:

if "Yes" is selected then one can view the results. The cursor up/down and page up/down keys can be used to navigate the results log file. When you have completed viewing the results log, fwts-live will inform you where the results have been saved on the USB stick (so that one can review them later by plugging the USB stick into a different machine).

A full user guide to fwts-live is available at: https://wiki.ubuntu.com/HardwareEnablementTeam/Documentation/FirmwareTestSuiteLive
To help interpret any errors or warnings found by fwts we recommend visiting fwts reference guide - this is has comprehensive description of each test and detailed explanations of warnings and error messages.
Below is a demo of fwts-live running inside QEMU:
Kudos to Chris Van Hoof for producing fwts-live
Wednesday 1 February 2012
3G using a Huawei E1552/E1800 (HSPA modem) on Ubuntu
So my internet service provider is rolling out a programme of speed upgrades and over the past few weeks I've suffered from various connectivity issues most probably because of infrastructure upgrades. I lost connectivity today at 6am and was told to expect to be connected by 9pm, so I popped down town and acquired a 3G USB dongle and a suitable data plan/ contract for my needs.
Typically these USB dongles are designed to appear as USB media devices (e.g. pseudo CD-ROM) and one has to mode switch it to a USB modem. Unfortunately I had a Huawei E1552/E1800 which required some USB mode switching magic, but to find this I first required internet connectivity. Fortunately I had a sacrificial laptop which I installed an old version of Windows XP which allowed me to then connect to the internet using the 3G USB dongle and I was able to then track down the appropriate runes. OK, I feel bad about installing Windows XP, but I was being pragmatic - I needed connectivity!
The procedure to get this device working on Ubuntu wasn't too bad. First I identified the USB dongle using lsusb to get the vendor and product IDs (12d1:1446):
Bus 002 Device 013: ID 12d1:1446 Huawei Technologies Co., Ltd. E1552/E1800 (HSPA modem)
Then I added the following runes to /etc/usb_modeswitch.conf -
..this appears in many forums on the internet, kudos to whoever figured this out.
Then I ran "sudo usb_modeswitch -c /etc/usb_modeswitch.conf" and this switched the dongle into:
Bus 002 Device 012: ID 12d1:14ac Huawei Technologies Co., Ltd.
..and I was then able to simply connect using network manager. Result!
** UPDATE **
Mathieu Trudel-Lapierre fixed this (9th Feb 2012) and now Ubuntu Precise works perfectly with the Huawei E1552/E1800. Thanks Mathieu!
Typically these USB dongles are designed to appear as USB media devices (e.g. pseudo CD-ROM) and one has to mode switch it to a USB modem. Unfortunately I had a Huawei E1552/E1800 which required some USB mode switching magic, but to find this I first required internet connectivity. Fortunately I had a sacrificial laptop which I installed an old version of Windows XP which allowed me to then connect to the internet using the 3G USB dongle and I was able to then track down the appropriate runes. OK, I feel bad about installing Windows XP, but I was being pragmatic - I needed connectivity!
The procedure to get this device working on Ubuntu wasn't too bad. First I identified the USB dongle using lsusb to get the vendor and product IDs (12d1:1446):
Bus 002 Device 013: ID 12d1:1446 Huawei Technologies Co., Ltd. E1552/E1800 (HSPA modem)
Then I added the following runes to /etc/usb_modeswitch.conf -
 DefaultVendor= 0x12d1
 DefaultProduct=0x1446
 TargetVendor= 0x12d1
 TargetProductList="1001,1406,140b,140c,141b,14ac"
 CheckSuccess=20
 MessageContent="55534243123456780000000000000011060000000000000000000000000000"
..this appears in many forums on the internet, kudos to whoever figured this out.
Then I ran "sudo usb_modeswitch -c /etc/usb_modeswitch.conf" and this switched the dongle into:
Bus 002 Device 012: ID 12d1:14ac Huawei Technologies Co., Ltd.
..and I was then able to simply connect using network manager. Result!
** UPDATE **
Mathieu Trudel-Lapierre fixed this (9th Feb 2012) and now Ubuntu Precise works perfectly with the Huawei E1552/E1800. Thanks Mathieu!
Subscribe to:
Posts (Atom)